New to Milkshape and pose creation? Have you tried other tutorials and gotten lost? Well, have I got the tutorial for you! This will take you through each step with pretty pictures and easy to follow instructions! I’m going to explain a little more than most other tutorials do since I am only using Milkshape and I know that everything seems a bit overwhelming at first. Take a deep breath and follow my lead!
First off, you are going to need a few things.
- Pose Player by Cmomoney
- S3PE Make sure you get the latest version and the one that goes with your computer type)
- S3 Anim Tool by Wes Howe – Make sure you get the latest version! (Currently AnimToolVO5)
- Male and Female Meshes or Child Mesh (Child Mesh is down a bit in Post #7)
Alright, now that we got this all squared away, let’s get to the good stuff! The first thing I suggest is making a folder named “Animations” open that folder and make two new folders one named “Meshes” and one named “Poses” this will help you keep everything organized.
Put your .rar files (The mesh files you downloaded) into the “Meshes” folder. Open the .rar files and you should get a Milkshape file ending with .ms3d and a text file named adult_rigfile.txt or child_rigfile.txt <– you will need these rigfiles so don’t delete anything!
Next, go into the “Poses” folder and create a new folder for the poses you will do. I try to keep the names simple so I know what it is quickly. For this tutorial, I’m going to make a folder named “Tutorial”.
As you can see, I have other pose package folders started, but we are just going to focus on the Tutorial one for now. I just like to keep my requests ready. Anyways, on to the next step!
Open up S3PE and go to File –> Open.
You will get a pop up window so you can search. On the left side, you should see “My Computer” click on that and open your (C:) drive. You will see a bunch of folders. You want to open the one that says “Program Files (x86)”.
Ok, so now that you have opened “Program Files (x86)” you will see more folders! Scroll down until you find the one marked “Electronic Arts” open that and you will see folders for all the EA games you have, including unique folders for each Sims 3 Expansion you have. Just forget all of that, you want to open the ”Sims 3″ folder. This is the folder for the base game. This folder contains 5 more folders. (Yay folders!) You want to open the one named “Game Data” and guess what, more folders! This time, open “Shared”… yup… more folders… open “Packages”. Guess what! This time, you should not see any folders! Instead you will see a bunch of .package files.
Open the ”FullBuild0.package” file. This file is HUGE so it may take a while. You will get a pretty green bar at the bottom of S3PE that shows you how much is left to load. When it finally does finish, you’re going to see the big jumbled mess of letters and numbers that make no sense, but have no fear! It’s not that scary! In the top left corner, right under the File tab, there is a little button titled “Name” click on this and your S3PE should now look like this:
Of course, yours may look a little different depending on how big you make it but whatever. You get the idea. Ok, now we are going to scroll for a really long time! But it’s not so bad because everything is ordered by it’s name. So scroll down, down, down until you find a_xevt_701 and a_xevt_702 either of these files will work.
Right click on one of the two and go to “Export and Rename”. A window will pop up asking you to rename the CLIP. It doesn’t really matter what the name is as long as it starts with “a_” so for example, I’m going to name this one “a_AK_tutorial01″.
Another window will pop up asking where you want to save it to. Find your pose folder and save it there.
Next, open Anim Tool. It will have 3 buttons on the left side and an empty box on the right. Click the middle button labeled “CLIP -> SMD”.
Find the folder that you just saved the file to and click on the .animation file. It will have a long crazy name, but the important thing is that it has the code you chose (a_AK_tutorial01) somewhere in the name and .animation at the end.
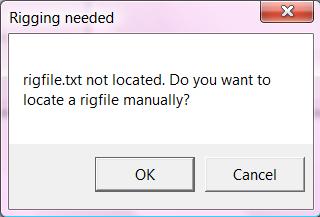
An pop up will appear asking you to locate the rigfile. Click “OK” and go into the “Meshes” folder or where ever you saved the meshes. There are two different types: adult_rigfile.txt and child_rigfile.txt you will need to choose whichever one you are doing. Since I am working with an adult I will choose the “adult_rigfile.txt”.
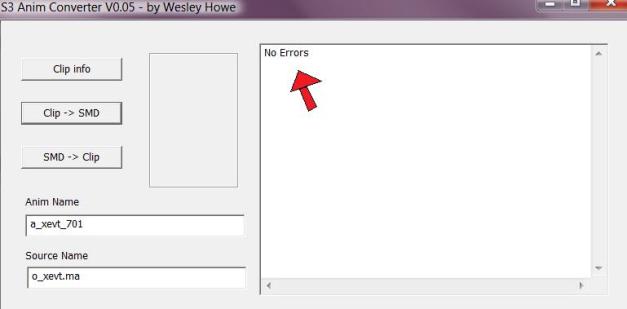
After you select the correct rigfile, you should see a “No Errors” message in the once enmpy box of Anim Tool.
Now, we are ready to open Milkshape and start working on poses! Note: If you have not registered your Milkshape and are not on a 30 day trial, you will not be able to save your creations!
Ok, so go to File -> Open and go to the Meshes folder. There are three different meshes:
I’m going to use a Male mesh since they are universal and most commonly used. Select the file and you will get 3 messages. Just click “OK” because they don’t do anything and honestly, I have never read what they say. So, now you are looking at your mesh and all you see is a giant blob of lines. (This only happens the first time!)
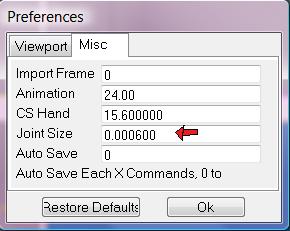
In order to get the lines to make a Sims shape, you have to go to File -> Preferences a window pops up, go to the Misc tab. There is a bar titled “Joint Size” you want to change this number to 0.0006 so that it looks like this:
Now, you have four panels, three with wire Sims and one with a fairly normal looking Sim. To change the other three to look the same, right click in each individual panel and check the “Textured” box. So that it looks like this:
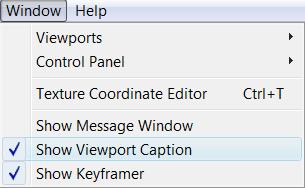
Next, go to the top of the program and click on “Window” Check mark the “Show Viewports Caption”. This will put bars above each panel that tells you what angle you are looking at and what the size of the grid is. It comes in handy when you need to change views.
The next little setup helper thingy that I do is change the grid size of the 3D panel. In the first number box, change the number to “9″. This will allow you to get close to the model without it disapearing.
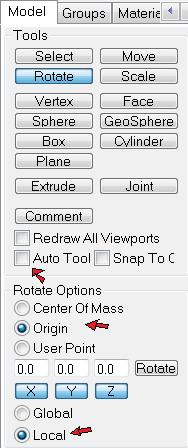
Now that we are all set up that way, let’s get the posing stuff set up. The first thing you want to do is go to the “Model” tab at the top right of the screen. Make sure that “Auto Tool” is not checked. This will make life a lot easier. Next, click on “Rotate”. There will be new options, you want to click on “Origin” and “Local”, this stops the poses from becoming disorted. (The joints will strech and flatten out.)
Now, we can go to the “Joints” tab and take a look at all the different goodies we have to play with. (If your computer is goofy like mine, you may have to use the arrows to move over to the proper tab.) There are a lot of joints to choose from, but here are the main ones that I use:
- b_Spine0,1,2 – These three joints move the back in different sections
- b_Neck/Head – Moves the neck and head around
- b_R/L_Thigh/Calf/Foot – Moves the various parts of the legs, labels R for right and L for left
- b_R/L_Clavical – This moves the clavicle bone, generally only moved up or down, but can be rotated a bit
- b_R/L_Upperarm/Forearm/Hand – Moves the various hand joints (Do not move the Bicep or Wrist until you are more familiar with the program!)
- There are also 3 joins for each finger, move these to create unique hands!
- b_RightUpLid/RightLoLid – Moves the right eyelids to open or close
- b_LeftUpLid/LeftLoLid – Moves the left eyelids to open or close
- b_JawComp - Moves the jaw bone, generally up or down to open or close the mouth
Of course, there are hundreds more, but these are the basic ones that I use most often. I will go a bit more in-depth whenever I get around to doing my advanced tutorials. Ok, so now that we know what joints to use, let’s learn how to move them!
As you already know, Milkshape provides you with 4 standard viewing panels. Front/Back, Left/Right, Top/Bottom, and 3D. All of these will move the joints differently except the 3D panel. That one is merely for viewing. I’m going to start by moving the legs, let’s say we are doing a sitting pose.
At the bottom right of the screen you will see a cute little button labeled “Anim”, you want this turned on or scary things happen. (When you try to move things, you will see just the bone move and not the body.) When it is turned on, the “Anim” will show blue and the black buttons will light up like this:
So, now we double-click on the b_R_Thigh_ so that we can move the right leg up into a sitting position. When the joint is selected, it should light up green. Using the Right/Left view panel, I can move the leg up and down like this:
Hmm, I don’t like that, push [Ctrl] + [Z] and the move will be undone. Perhaps, it wasn’t so bad, [Crtl] +[R] will redo the move. Maybe I want the legs spread apart, use the Top/Bottom panel to move the leg closer and further away from the body. Like so:
You can also use the Front/Back panel to rotate the thigh, but for this simple tutorial, I’m not going to do that. So, I do the following steps with the Left Leg so that it matches. Like so:
Well cool, now he looks kinda like he is sitting. By selecting the b_R_Calf and b_L_Calf I can move the lower legs down and make it look like his feet are on the floor. Like this:
Sweet, now it is starting to look pretty cool! Let’s try to move his arms so they are more interesting. Using the b_R_Upperarm and b_L_Upperarm I can move the arms so they are closer. Then I use b_R_Forearm and b_L_Forearm and move them so they appear to be on the legs. (Remember when creating poses to leave gaps between body parts to accommodate for clothing. These meshes are naked!) Like so:
Hmm, so it kinda looks like he is sitting on the toilet… Oh well. This is just basic stuff. You can play around moving the joints that I listed and tweak your pose as much as you want! I’m going to go ahead and skip forward a bit. This is a little bit harder, but still very simple, since the pose is “Sitting” you will have to move the mesh down to floor level otherwise he will be hovering above the ground. So to fix that, you will need to select the b_ROOT_bind_ joint. This should highlight the entire body. Go back to the “Model” tab and select “Move”.
So now, to make it easier to see the “floor” hold [Ctrl] and left click on one of the panels, dragging it until you see the dark blue line under your pose. (The line will appear yellow in the Front/Back panel and yellow and Blue in the Top/Bottom panel!) This is the “floor” line and should NEVER have anything below it. (Unless you want your sim to be sunken in the ground.) Ok, now move the mesh down until the feet are just above the line, leaving room for shoes and rugs. (You can zoom in closer to your pose by holding [Shift] and scrolling with your center mouse wheel. Or you can click and drag while holding [Shift].)
Ok, so now our pose is looking pretty cool and we are ready to test it out in-game! Hooray!
Go to “Animate” at the top in the tabs area. Go down to “Set Keyframe” and click on that. Your pose will turn yellow!
Now, click on the “Anim” button at the bottom and the pose will pop back to its origional stance. Click on the “Select” button under the “Model” tab and click in each panel until all of the poses look the same. Like this:
Before we get ahead of ourselves, let’s test the pose and make sure it works fine. Click on the “Anim” button again and your mesh should pop back into the pose you put it in. Click in each panel until they are all in your pose. If any part of the pose is messed up, you may have accidentally “Broke” the mesh and it will end up looking like this in-game (Thanks Daisies for the helpful photo!):
So after you check the pose and everything is still in ship-shape, get out of Animation mode (the pose will be back to the neutral standing pose) and go to File -> Save As You will want to save the pose in the same folder that you saved the CLIP and SMD files. I always save the poses with the same name as used before. Like this:
Great! Now it is saved and you will have it to go back to if you want to ever make changes. Next step, go to File -> Export -> Half Life SMD (It’s the first one on the huge long list of things.)
A window is going to pop up, navigate to where you had the SMD file saved and select it. Press “Save”.
Another window is going to pop up, click “Yes” because you do want to overwrite the file. Then another window will pop up, you want to select “Sequence” and then push “OK”.
Nice job! You have just created a pose and successfully exported it! You are almost done, now we just have to get that puppy into the game! Open S3 Anim Converter. This time, we are going to click on [SMD -> CLIP]. A window will pop up, find your pose file and select the SMD file that you just exported the pose as.
This time, you should get the “No Errors” message almost instantly. If you receive that, then everything is going well. If not, then try exporting the pose again, making sure that you are out of animation mode.
Next, open S3PE again and go to File -> New. The tabs at the top should turn black and be clickable. Go to Resource -> Import -> From File…
A window will pop up, navigate to your pose folder, and you should see three different files ending with:
- .animation
- .animation.bak00
- .smd
You want to select the .animation file and click “Open” another window pops up, don’t change anything on it, just click “OK”.
Next, go to File -> Save As and save the file using the same code as before. The screen will blink and everything is good. Now open your pose folder where everything is saved.
You should have a nice little collection of files including the .animation, .animation.bak00, .smd, .ms3d, .package. Like this:
Oh and by the way, in case you aren’t real computer savvy, you can make your folder appear as mine does by clicking onthe “Views” button until they show up as a long file name like the above photo. This will help when you are looking for the files.
Ok now, Copy the .package file. In this case it’s a_AK_tutorial01.package navigate to your Sims 3 Mods folder and paste the .package file, this will put it into your game.
I bet you are feeling pretty proud of yourself right now aren’t you? Well you should be! You are in the final stage… Testing your pose! Let’s go check it out and see how it looks!
Open your Sims 3 game, load a household. ( I have an empty world that I test poses in.) Click on the pose player object and select ”Pose By Name” type in the code for your pose. In this case a_AK_tutorial01 and hit enter. Your Sims should pop right into the magical pose you created! Just like this:
As you can see, this pose could use some work, but I only spent about 2 minutes making it for the purpose of this tutorial and it will now be deleted. However, if you like your pose but want to make adjustments, just open up the .ms3d file that you saved and go back into animation mode and repeat the process over until you are happy. You can export these as many times as you want, just don’t forget to go back into Anim Tool and covert them to a CLIP file and then save them in S3PE, copy the file and paste it into your Mods folder. You can save over the original files too, you don’t need to keep making new files.
Just a little bit of a tip, you can deleted the .animation.bak00 files. You will get another one each time you export the SMD from Milkshape, but they are worthless and just take up space.
I hope that this clears things up for you and you can have fun making poses!! If you have any questions, go ahead and ask, but I may not have an answer for you. And yes, I will be making more tutorials so if you have a request for what you would like to see, feel free to ask!
I know that this is frustrating and confusing at first. Don’t expect to be a pro at first, don’t feel bad about starting over. I made several poses before I made one I liked. I look back at my first pose packs and I see how much I’ve improved. Just don’t give up if it’s something you want to do. It will get easier and it will make more sense over time. I can’t tell you how to make your poses, but I can help give advise and explain things as clearly as possible. If something on here doesn’t make sense, let me know. If you think something needs a little more attention given to it, let me know! I want to make pose creating fun and as simple as possible. Before you know it, you will be whipping through them faster and they will start to look better!







No comments:
Post a Comment