Lots/ Stages

********IF YOU ARE GOING TO DOWNLOAD MY LOTS READ THIS FIRST**********

My lots are for storytellers and taking pictures ONLY!!! They are not a Showtime Venue, unless you put the stage and make it that way. IT WILL NOT WORK AS A VENUE. Thanks for looking at my "Stages". I will make some with the stage, but not right now.
Sunday, January 12, 2014

Tutorial MilkShape #2 Couples (Simprov Poses)

So, it seems that you have successfully learned how to create single poses and now you wish to start creating couple poses? Well, it’s a good thing that I am here to help you out! While this may seem a bit confusing at first, it’s actually very easy. Just like with making poses, it just takes practice.

The first thing that you want to do is create your first pose. I tend to pick the one that will be easiest to do first. However, you can always change it so don’t worry if things don’t line up perfectly right away. After you create your first pose, save it and export it as you normally would. You don’t necessarily have to export it right away, but make sure you save it!!

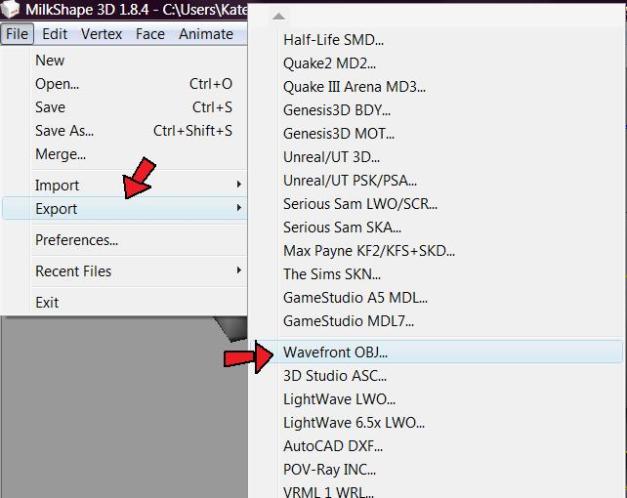
After saving, click on the Anim button again so that the mesh is back in the pose. Then go to File -> Export -> Wavefront OBJ

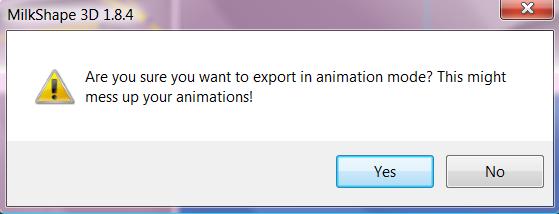
Once you click on Wavefront OBJ, you get up pop-up that warns you it will ruin your pose, just click ok. I know it sounds scary, but it won’t hurt a thing.

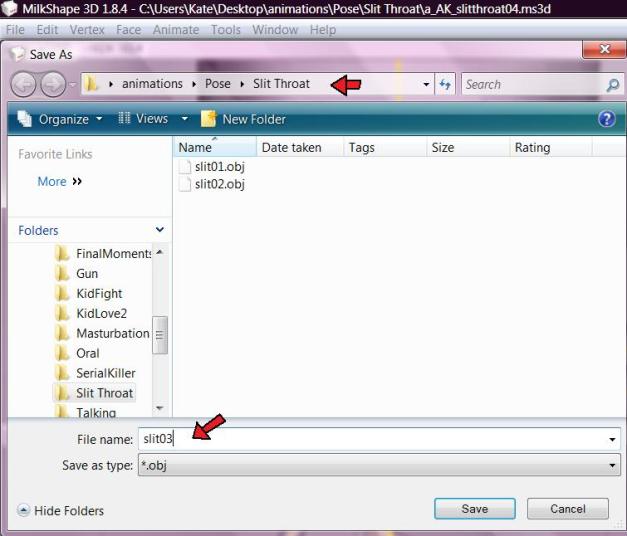
So then you get another pop up to name the object. This is pretty self explanatory. Save it in your pose folder with your SMD and MS3D and Animation files. You won’t be able to see them, but that’s ok. The name doesn’t matter as long as you know what it is that you are saving.

Now, go to File -> New and when it asks to save the pose, click “NO”. We don’t want your pose getting messed up and you already saved it… RIGHT?!

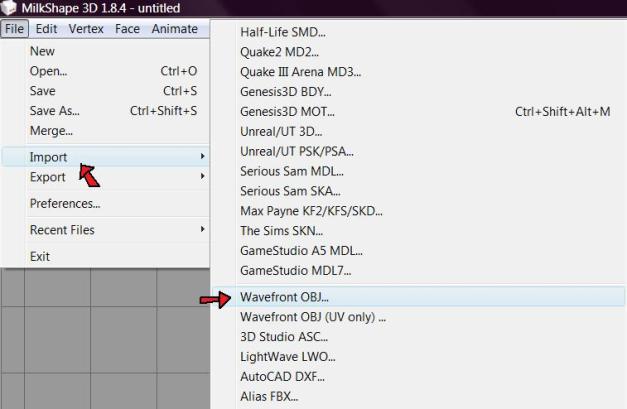
Now that we have a blank canvas again, we are going to now import the object we just created by going to File -> Import -> Wavefront OBJ

A pop-up will appear asking you to select the object. Navigate to wherever you just saved it to and select the file. No questions asked, the pose should pop up without the ”skeleton showing. That’s because it’s an object now, not a mesh. So you can only rotate and move it around now. But before you get ahead of yourself, we have to make it one complete object so that we can easily get it in and out of the second pose.

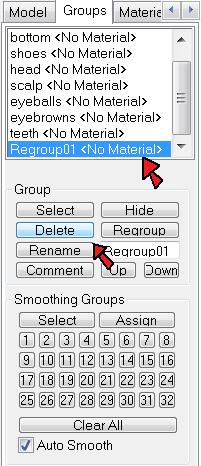
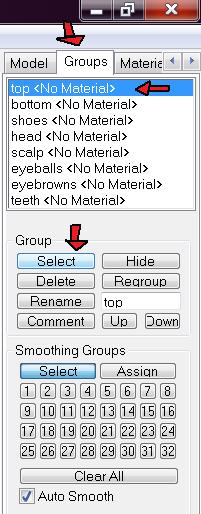
To do this, select the “Groups” tab on the right side of your screen. You will get a list of body parts that all say <No Material>. Under that are a few buttons. Click on the first group, it should be Top. Then click Select from the option of buttons.

Oh by the way, you do not want to use any of the smoothing groups buttons. They won’t help you out.

OK, so now that you have selected the Top, nothing has changed. For some, the object may light up, but for most it won’t. It doesn’t matter either way. Now we click on Bottom and then select again. See a pattern here? You will go down the list of groups clicking on each one, one by one, and then selecting each item. Do each group once until you have gone down the whole list.

Find the Regroup button, it should be down and across from the Select button. Click on that and if you did it right, the group list will clear out and you will end up with Regroup 01 <No Material>. If you have done this more than once since opening Milkshape, the numbers will change, but it doesn’t matter.

Now that your object is one complete object, Export it as a Wavefront  OBJ again, saving over the original file. You may get the warning again that you are in animation mode, but that does not matter. Just click ok. It will ask if you are sure you want to replace the original file, just say yes.

Now, go to File -> New  once again and you will be asked if you want to save, click “NO”. This time, open up the mesh you want for your second pose. In this tutorial, I am using two male meshes, but all of this works with any of the meshes you want to use.

Once your mesh appears, go to File -> Import -> Wavefront OBJ and select the object you just regrouped. The object will appear right on top of your mesh. If you are still in the “Groups” tab, you will see your Regroup 01 <No Material> show up at the bottom of the list.

Now, I have figured out how to make Pop-To-Pose couple poses. This is very simple to do and it makes it easier for users. To do this, once you have imported the Wavefront OBJ, don’t move or rotate the object pose at all. Do all of the moving on your mesh. This will cause the poses to work together without having to be moved.

Since I knew how I wanted this set to work out, I created the first pose facing the opposite direction. That way, it doesn’t show up backwards when you use the poses.

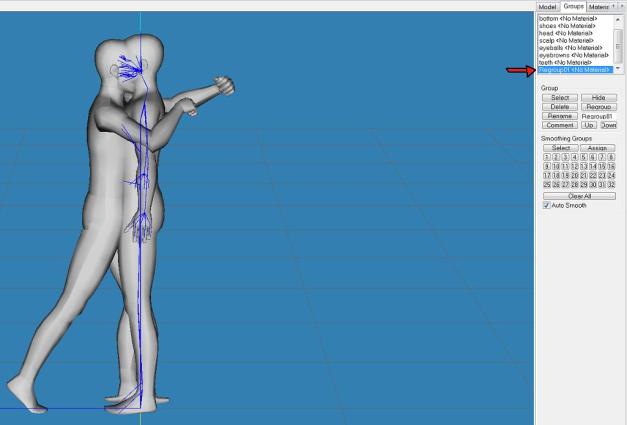
Now, all you have to do it move, rotate, and create the second pose. Once you are done and you like how it looks, navigate back to the groups tab at the top and click on the “Regroup 01″ group. Make sure you have not set the keyframe OR saved the second pose just yet. This means, do not exit from Anim mode or you will lose your pose!! (Yes, I have done this and it sucks having to redo it!)

OK, now, click on the Delete button. The first pose/object will disappear.


With the first pose gone, you will now just see your second pose. Set the keyframe and save/export the file as you normally would have. Go in-game and if you have used my Pop-To-Pose method, you place both of the sims on top of each other, facing the same direction, and tell them to do the poses. They should “Pop” right into place! If you are not satisfied with how they look, remember you can always go back and change them.

If you decide that the first pose needs moved a bit to better fit the second pose, you can repeat this whole process with the second pose and then importing it into the mesh for the first pose.

Make sure you always regroup before putting the two poses together.

Make sure you always open the mesh BEFORE importing the Wavefront OBJ.

Once you get this down, it only takes about a minute to do. It’s not hard, and it can really help improve your coupling poses.

Questions or comments? Reply below, on my Facebook page, or on RWN’s Simprov Thread. I’m always happy to try to help!

1 comment:

  1. Thanks! I've been looking into trying to make couples poses but never knew how to match them up! I will try this!

    ReplyDelete